
All · Infographics & guides · How-to guides
247Isometric Cutaway Explainer
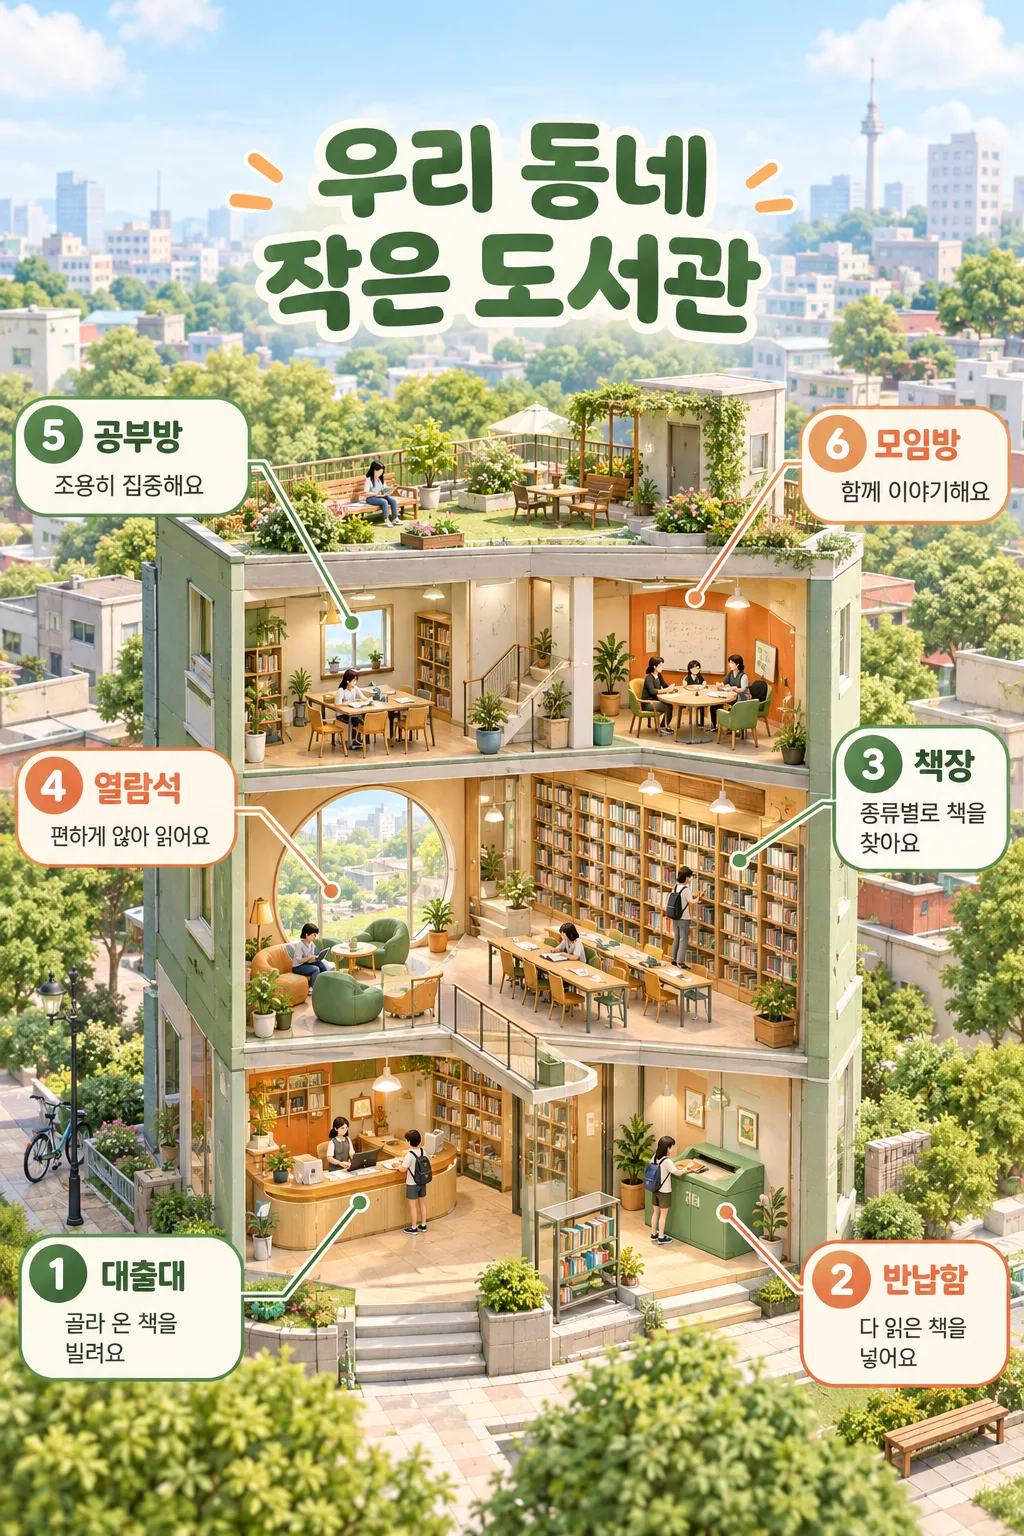
An infographic that opens up a building in 3D and connects six descriptions to their actual locations.
What you get
- Isometric cutaway showing furniture and people
- Entered title and six descriptions
- A single image connecting the scene and descriptions
ChatGPT Free OK
Fill in the fields
- 1Fill in the fields
- 2Copy the prompt
- 3Paste it into a GPT chat
- 4Send it as is and you get an image like the thumbnail example
- 5Attach a real photo that fits the card and it is used in the result: a background photo for background cards, a person or food photo for those cards Optional
Full prompt 4,478 characters
Directly generate one finished image now. End with the image itself without questions, explanations, or code.
Output exactly one finished 2:3 portrait image, 1024x1536 pixels. Leave the top 12% and bottom 15% free of essential text.
Title: 【Title】
Spatial Layout: 【Spatial Layout】
Description 1: 【Description 1】
Description 2: 【Description 2】
Description 3: 【Description 3】
Description 4: 【Description 4】
Description 5: 【Description 5】
Description 6: 【Description 6】
Primary Color: 【Primary Color】
Accent Color: 【Accent Color】
Lighting: 【Lighting】
People Density: 【People Density】
Highlighted Space: 【Highlighted Space】

A high-end 3D miniature cutaway information illustration explaining a single space. A fictional building is viewed from an isometric 3/4 top perspective with the front wall opened to reveal the interior. It is a single connected building with floors, pillars, and stairs, not separated floating explosion diagrams. Follow the order and uses listed in the spatial layout. The large building occupies about 60% width and 70% height in the center of the screen, the title is centered at the top, and description boxes are arranged alternately with three on each side. Do not overlay narrow text boxes on top of the image. In vertical orientation, floors stack up; in horizontal orientation, the same building is placed large and the six descriptions are rearranged into two columns on both sides.

Draw enough small furniture, storage, lighting, handles, handrails, and potted plants appropriate for the use of each space. Differences in paper, wood, rough walls, matte metal, and glass are visible even when zoomed in. Bookshelves feature spine heights and gaps between books, and desks have small open books and chair legs. Render realistic contact shadows under lighting, and people perform everyday actions like holding items or sitting. Follow the chosen people density. Make the highlighted space recognizable with wider windows and richer interior props without leaving other rooms empty. Repeat the two chosen colors in the architecture and description numbers while maintaining natural object colors. Enrich the space by continuing small trees, walkways, and floor tiles into the background.

The title is written exactly once in large legible letters. The six descriptions are written once each with numbers 1 to 6 in the entered order and spelling. Change long dashes to line breaks, organizing up to two lines with a bold subheading on the left and an easy explanation on the right. Connect thin, short lines from each description to its corresponding room or object, ensuring lines do not cross through other text. Do not invent unentered numbers, efficacy, events, contact info, or room names. If the space and descriptions conflict, naturally include the items needed for the descriptions into a small virtual space rather than the spatial layout, without writing extra text. Do not put readable text on the book spines in the drawing.

This is a single completed illustration, not a production architectural drawing or engineering design. There are no trademarks, existing characters, artist names, signatures, watermarks, comparison boards, or device mockups. The title and descriptions are entirely contained within the center outside the top 12% and bottom 15%, while the scene fills the edges. Complete a single sheet based solely on inputs without searching for reference materials or follow-up questions.

Draw exactly SIX callout boxes. If a description line is blank or missing, invent a fitting place and short line from the spatial layout for that number, in the form "Place — what happens". The numbers 1, 2, 3, 4, 5, 6 each appear exactly once, with only the six input place names as headings. Do not add any rooftop garden label, number, or callout. Spatial layout and highlighted space guide the illustration and must not become printed words. Keep the entire title between 20% and 26% of the image height, with the roof below it.


Keep the top 18% free of title letters and title banners; extend detailed trees, distant city, and sky there. Use a readable two-line title at 20–26% height without a wide banner. Lower and widen the building slightly so all three floors fit.

[Final output format]
Output exactly one finished 2:3 portrait image, 1024x1536 pixels. Leave the top 12% and bottom 15% free of essential text.
This selected output format takes priority over any fixed canvas size or aspect ratio elsewhere in this template. Adapt the composition, text zones and margins to the selected canvas without stretching or cropping essential content. Device safe areas apply only when a device is selected. Never print these format instructions on the image.
How did it turn out?
You may also like

How to use it · FAQ
When Opening Up Spaces for Explanation
Use this when you want to introduce what happens inside a building at a glance, such as a library's checkout desk and reading seats. Six descriptions are attached next to a 3D building featuring small furniture and people. Unlike a general text list, you can find the actual location at the end of the leader lines.
Start with the Library Example As Is
Write down the spatial layout in order from the bottom floor up. You can write it briefly like the example's '1st floor checkout desk, 2nd floor bookshelves'. For descriptions, write the place name and what happens there in one box, like 'Checkout Desk — Borrow books'. Make sure the six boxes point to different places. When changing to a new space, change both the spatial layout and the six descriptions together. Descriptions 1–6 are all optional; any you leave blank are filled in by the AI to match your spatial layout (floors and rooms).
Choices That Change the Image
Primary colors apply to walls and floors, while accent colors apply to numbers and small furniture. Choosing evening turns on the windows and indoor lighting. 'No people' is great for introducing only the space, while adding small people shows usage scenes. In the highlighted space, write the place you want to show in the most detail, such as 'Round window in the 2nd floor reading area'.
Check Before Saving
Check if there are six numbers, if connecting lines point to the correct rooms, and if short texts like 'Return box' are accurate. To fix an error, point to a single spot and modify it like 'Move the end of line 3 to the 2nd floor bookshelf'. The cover is a fictional library and not a blueprint verifying the actual building's structure, flow, or facilities. Use it for class explanations or introducing spatial ideas.